How to Add an Intro to Your Video on Your iPhone

Knowledge Center

Though I would always recommend editing on a desktop computer with full-featured editing software, I am constantly amazed by how much you can accomplish on a smartphone. I often get emails from people asking how to download and edit their intro on iPhones, so I thought this guide might fill in some of those blanks for someone who wants to turn their phone into a production studio.

How to Add an Intro to Your Video on iPhone

This tutorial is broken into two parts: getting your intro video downloaded onto your iPhone and adding the intro to your video. That means I'm making two pretty big assumptions right off the bat:

Assumption 1: you already have your video ready to go. This tutorial is very specifically concerned with adding your intro to your ready-to-go video, so I'm not going to be talking about recording strategies or broader editing/motion graphics strategies specific to Android.

Assumption 2: you have already purchased an intro video (hopefully from Intro Maker)! The first part of this article is very specific to how Intro Maker delivers your final video (a link in an email), but the second part of the article should be applicable to any intro video service.

This article is written with the iPhone in mind, specifically, but a lot of these concepts will also apply to iPads. These specific apps might not be available or might look slightly different, but in general you need to solve the same two problems: download your intro and add it to your video. With those two leading assupmtions out of the way, let's get to it!

Part One
Get Your Video Download Link

Once you are happy with the customizations on your Intro Maker video and complete the checkout flow, your options are sent to my render server for processing. Though this can vary depending on how complicated the template is and how many other videos are in the queue, I usually give 2 hours as a safe estimate for render time.

When the video finishes rendering, a download link will be sent to the email I have on file. If you don't see the email, be sure to check your spam folders. In the screenshots below, I'm using a Gmail account added to the native mail client.

To find an intro video in your spam folder, first tap the Mailboxes button. Tap on the Junk folder label to look in your spam folder for your intro video. Tap on the order complete email to view your intro video link.

If two hours have passed and you haven't gotten your video, check your junk folder. Tap the mailboxes icon and then tap "Junk." Open this email.

Tap on the download link to view your intro video. By default, your intro video will play fullscreen. Tap on the X to exit out of fullscreen. Tap in the URL bar to select your intro video's download link.

Tap the download link provided. The video will open in Safari and begin playing fullscreen by default. You need to tap on the "X" icon at the top left to stop the video and go back to the normal browser view. Tap the URL in the browser bar—by default, everything will be selected, but you won't be able to copy it yet.

Tap the URL again to drop the selection of your intro video URL. Tap the URL again to bring up the selection options and press Select All to select your intro video download link. After selecting the whole URL, you can press the copy button to copy your intro video download link into your paste buffer.

Tap the URL in the browser bar to drop the current text selection. At this point, your keyboard will come up. Tap and hold the URL and the selection options will appear. Choose "Select All" and then "Copy." You now have your download link in your paste buffer and can move on to Part Two.

Part Two
Download Your Intro Video to Your iPhone

While you can download videos easily on Android, iOS devices do not have a native way to save video files to your camera roll. You need to download an app that allows you to paste in a URL. Searching for these can be... difficult. The vast majority of "video downloader" apps are designed to integrate with Instagram and mostly facilitate reposts. I downloaded and tested around 20 such apps before finally settling on the apps that can do the trick below.

A word of warning, though. A lot of these apps are a bit spammy in nature. They will try to get you to tap on ads or agree to offers, so keep a vigilant eye on exactly what you're tapping. I'm actually tempted to just write my own video downloader app, but until that happens the apps below will get the job done.

Documents by Readdle

Documents is a full-fledged file manager, and it is by far the least dangerous file download app I'm going to walk you through. It's also the most complicated, though. Because it's designed to so so much more than just download videos, it can be a little more confusing at first. Click here to download Documents on iOS or click here to learn more about the app.

Use Readdle Documents to download your intro video onto your iPhone camera roll.

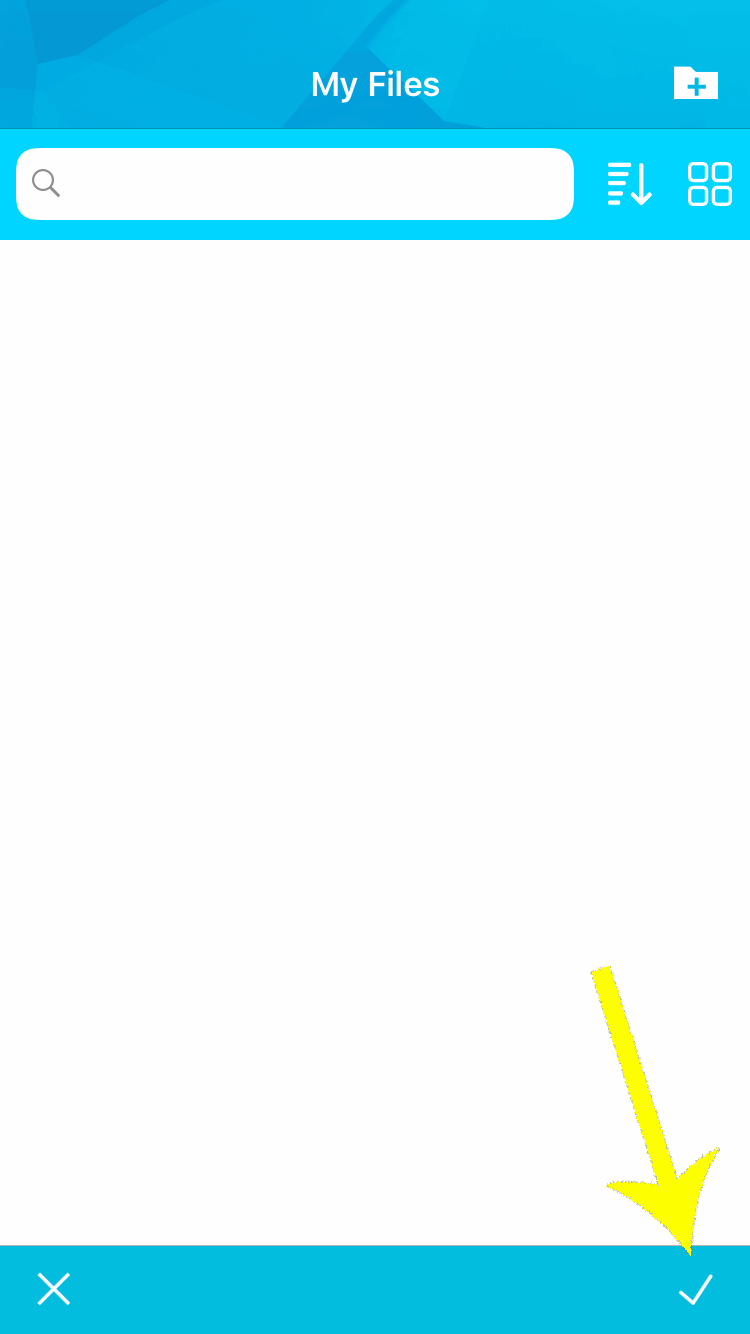
Once you have the app downloaded and open, tap the web browser icon at the bottom right of the main screen.

Documents will recognize the download link in your paste buffer and let you download your intro video to your iPhone. Use Documents to save your intro video to the default location on your iPhone. After downloading your intro video to your iPhone, press the file browser icon to go back to the main screen.

If you followed the directions in Part One, your video download link will be in your paste buffer. Documents will automatically detect this and show the link in the "Link you copied" section of the screen. Tap that section and you'll have an option to download. Press "Done" and the file will start to download. At this point you can tap back to the main screen by pressing the folder icon in the bottom left.

Tap on the Photo Album view in Documents so that it will open the iPhone prompt to authorize access. Press OK when the iPhone popup comes up asking for access to your photo library.

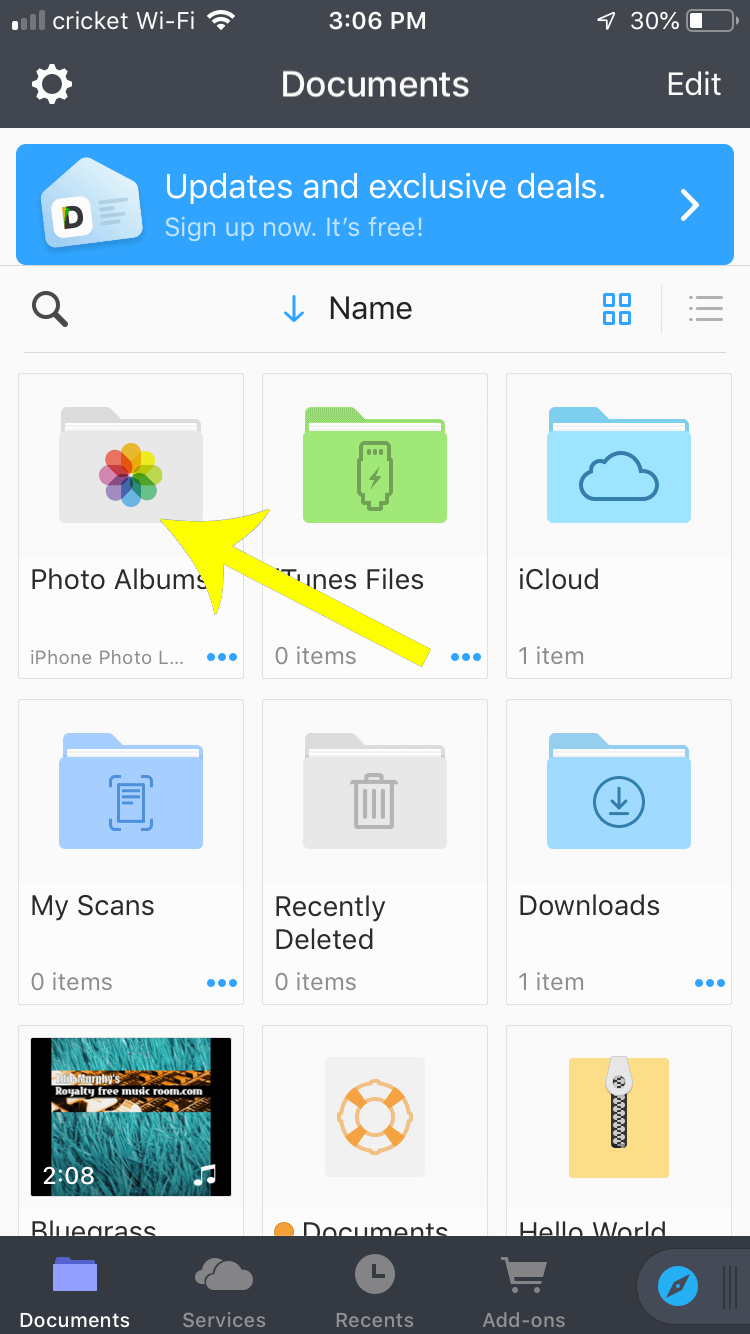
Before you can move the video on to your camera roll (which makes it easier to find in editing programs later), you need to grant Documents permission to access your photos. Tap the Photo Albums icon and press OK on the permissions prompt. From there you can back out to the main view.

Click on the Downloads folder, which is where your intro video downloaded in the previous steps. Tap on the three dots below your intro video to view your file options. Choose the Move button to move your intro video from the default download location to your camera roll on iPhone.

Go in to the Downloads folder and tap on the three dots underneath your downloaded intro video. From the options that pop up, select Move.

When the file browser opens, choose the Documents folder. Within the Documents folder, choose Photos to save your intro video to your camera roll. Press the blue button at the bottom of the screen to finish moving your intro video to your camera roll on iPhone.

Within the Move dialog, browse to Documents/Photos and then press the 'Move to "Photos"' button at the bottom of the screen. Your downloaded intro video is now on your camera roll, and you're ready to move on to Part Three.

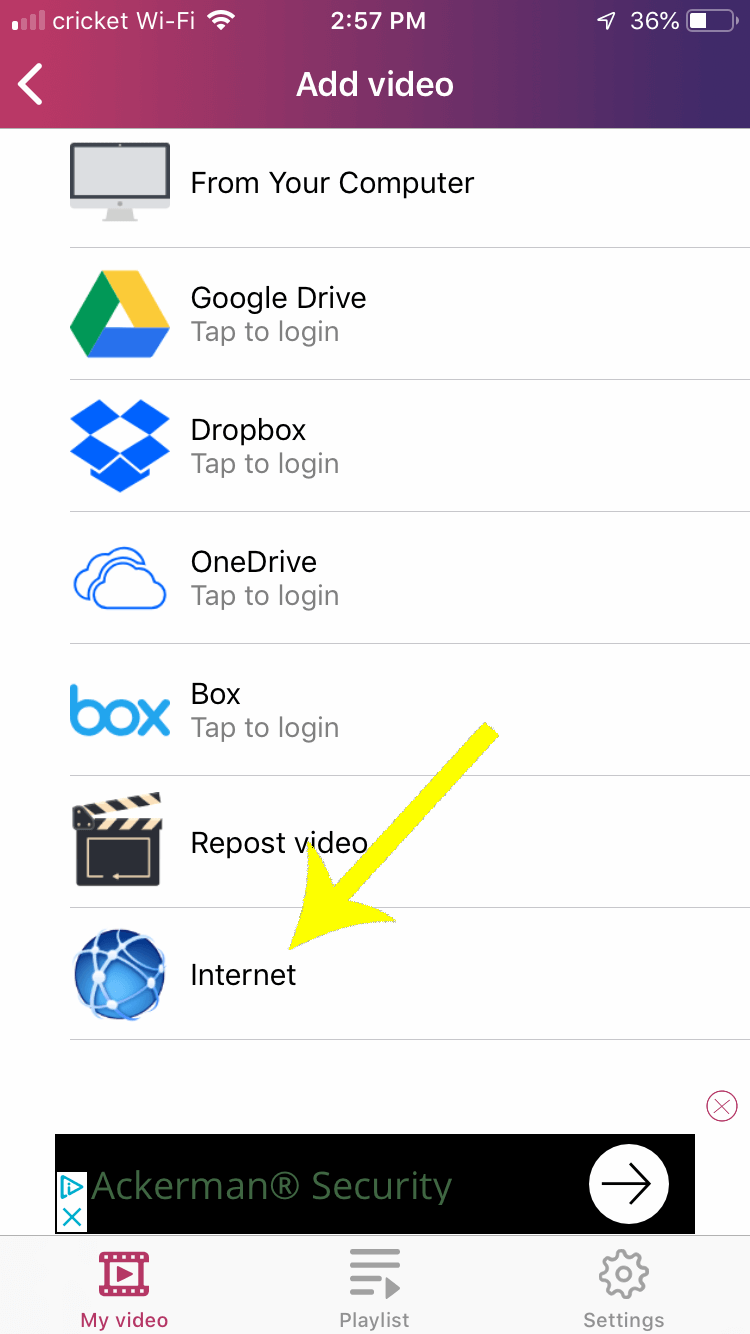
Video Saver PRO+ Cloud Drive

Video Saver allows you to download videos from your Google Drive, Dropbox, or Direct URLs. They do have a pro version available for $2.99 USD which allows you to keep more files downloaded, but if you're simply using this app to add things to your camera roll you shouldn't run into this cap. Click here to download Video Saver on your iPhone.

Use Video Saver PRO+ to save your intro video to your camera roll.

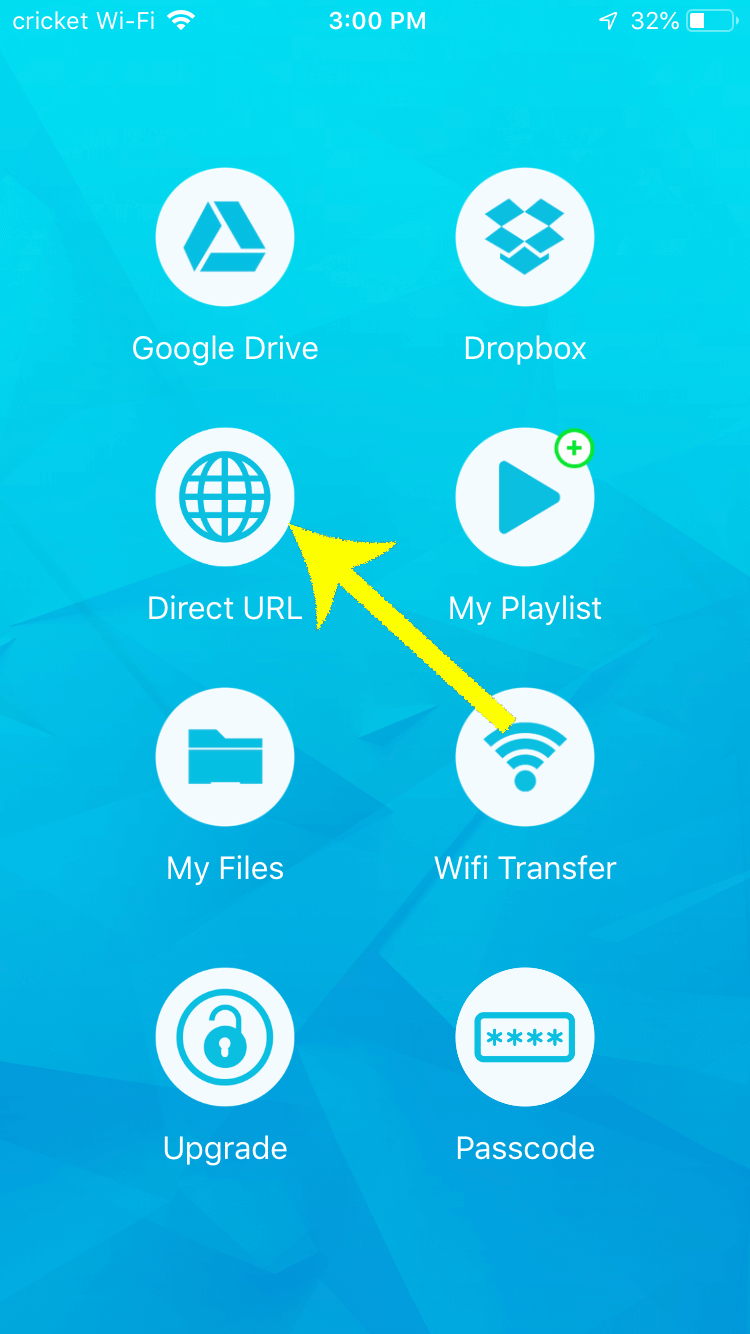
After you have the app installed and opened, tap the Direct URL button.

After pressing the Direct URL button, paste in the URL you copied from step one to begin saving your intro video to your iPhone. Press the download button to begin saving your intro video to your iPhone.

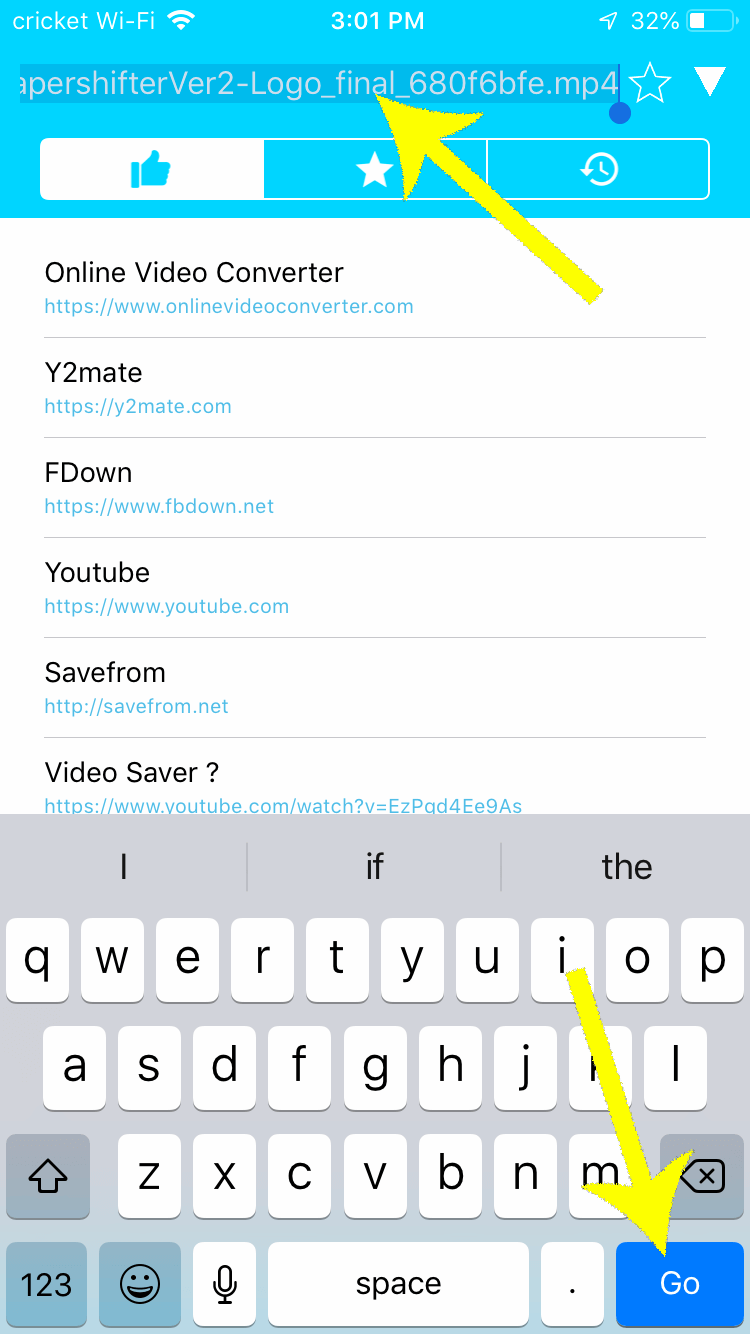
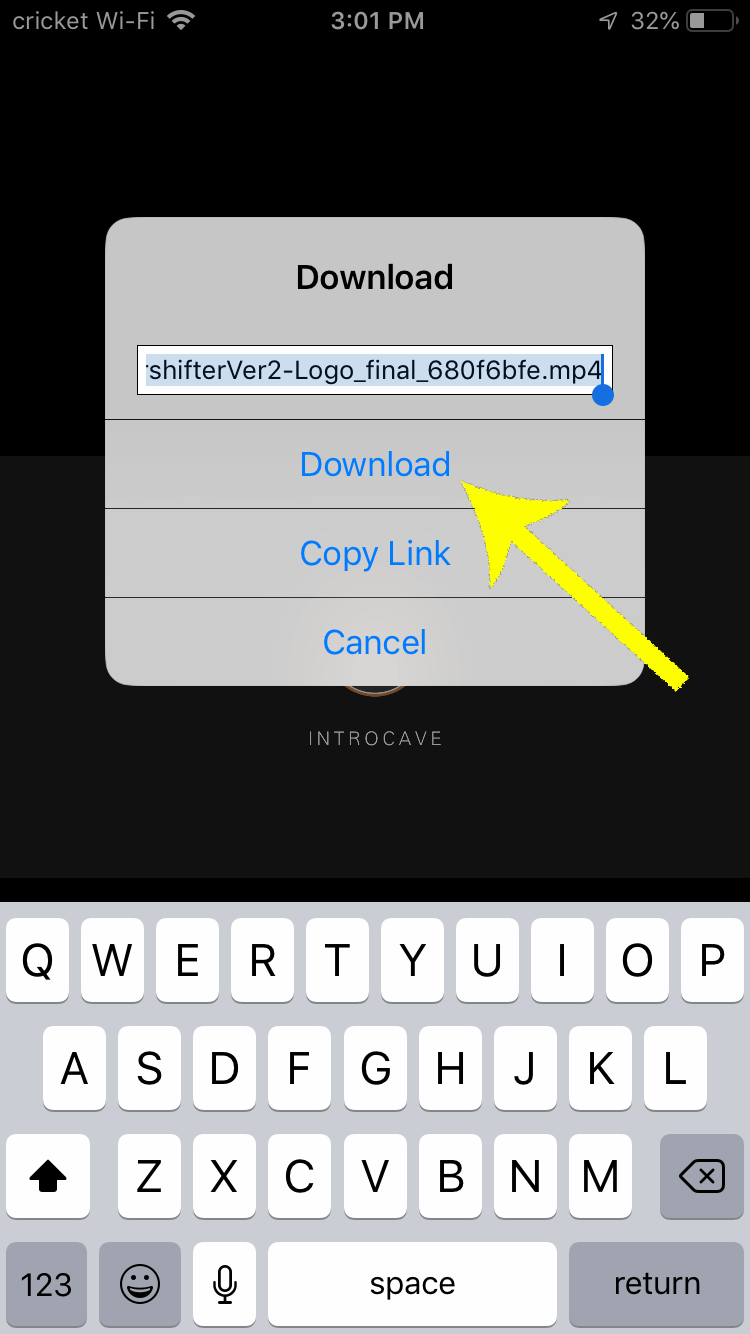
Tap the URL bar at the top and paste in the URL you copied in Part One. Press the Go button at the bottom right and you'll get a popup offering to download the file. Tap the Download button.

Press the little blue check in the bottom left of the screen to begin downloading your intro video to your iPhone.

This screen confused me the first time, as it will appear that the download button didn't do anything. The app is actulaly waiting for you to confirm that you want to download the file. Press the check button in the bottom right.

Press the three dots on the right side of your video to open the file options and export your intro video to your iPhone camera roll. When your iPhone prompts your for access to your camera roll, select OK to finish saving your intro video to your photos.

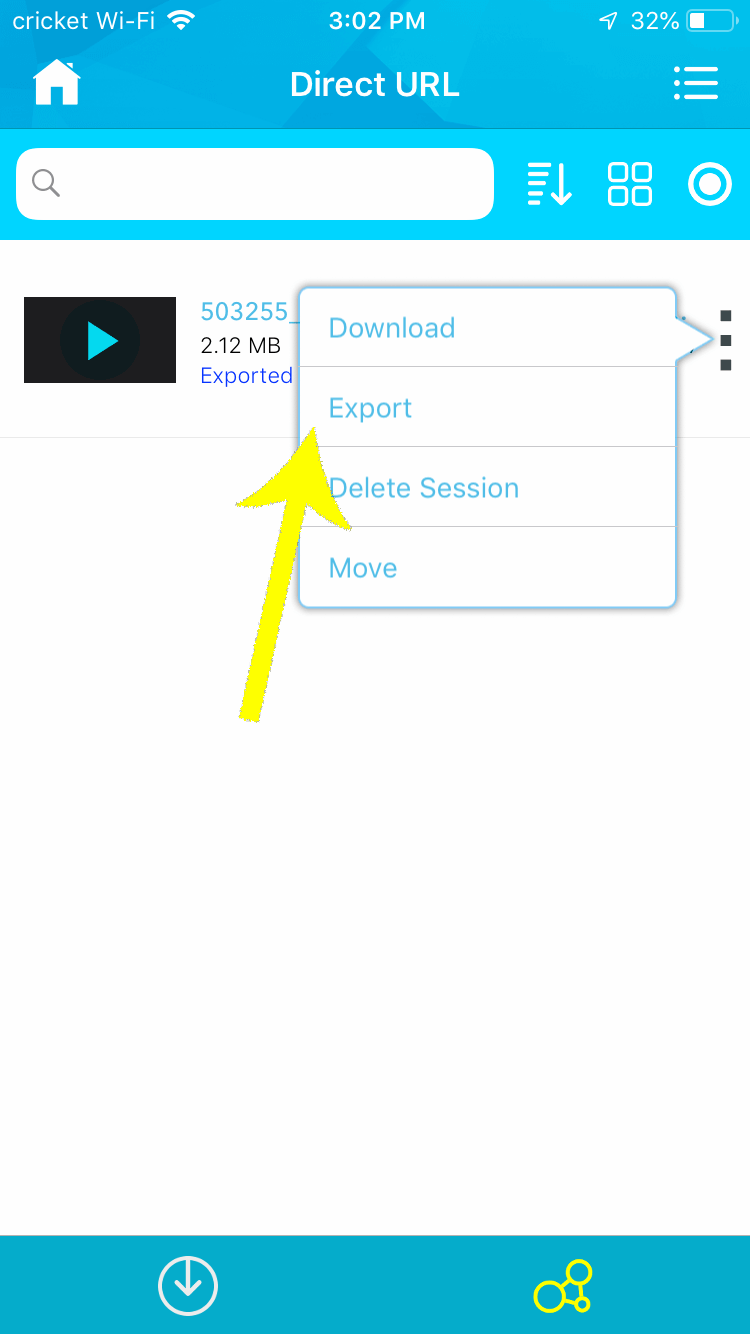
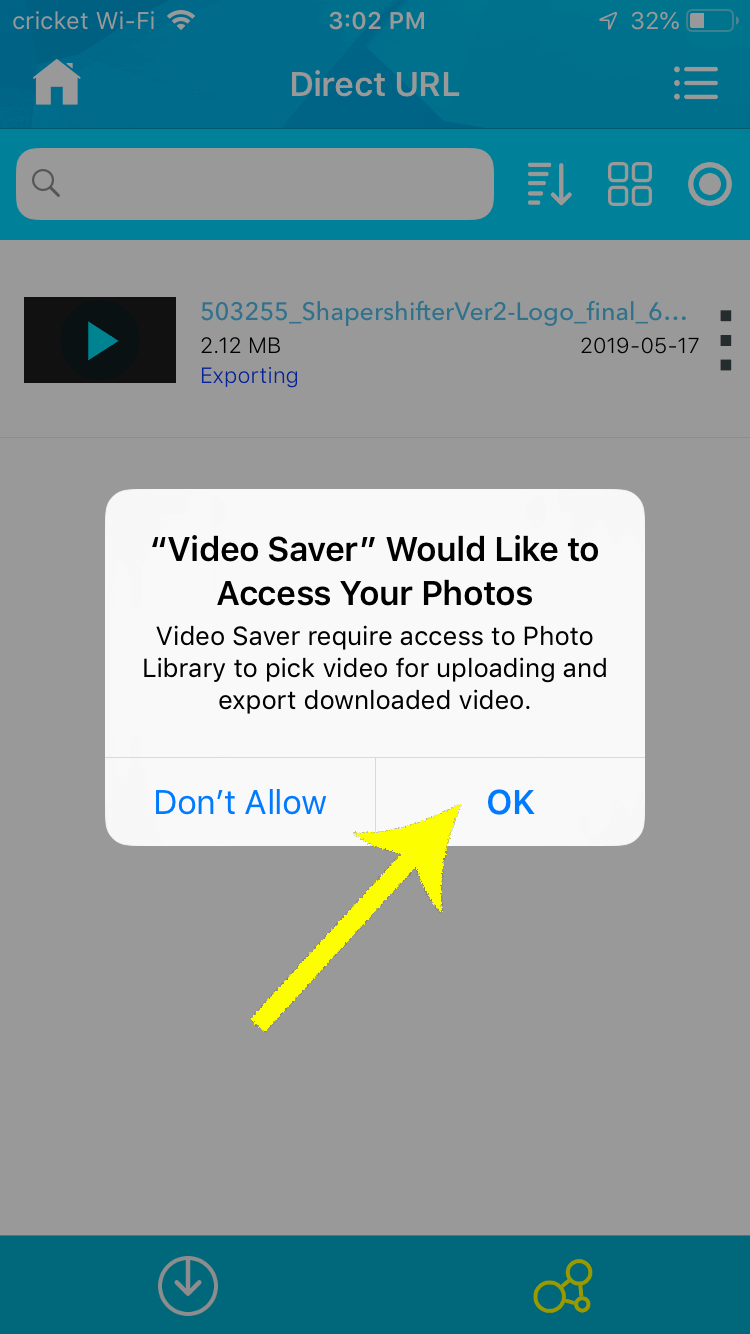
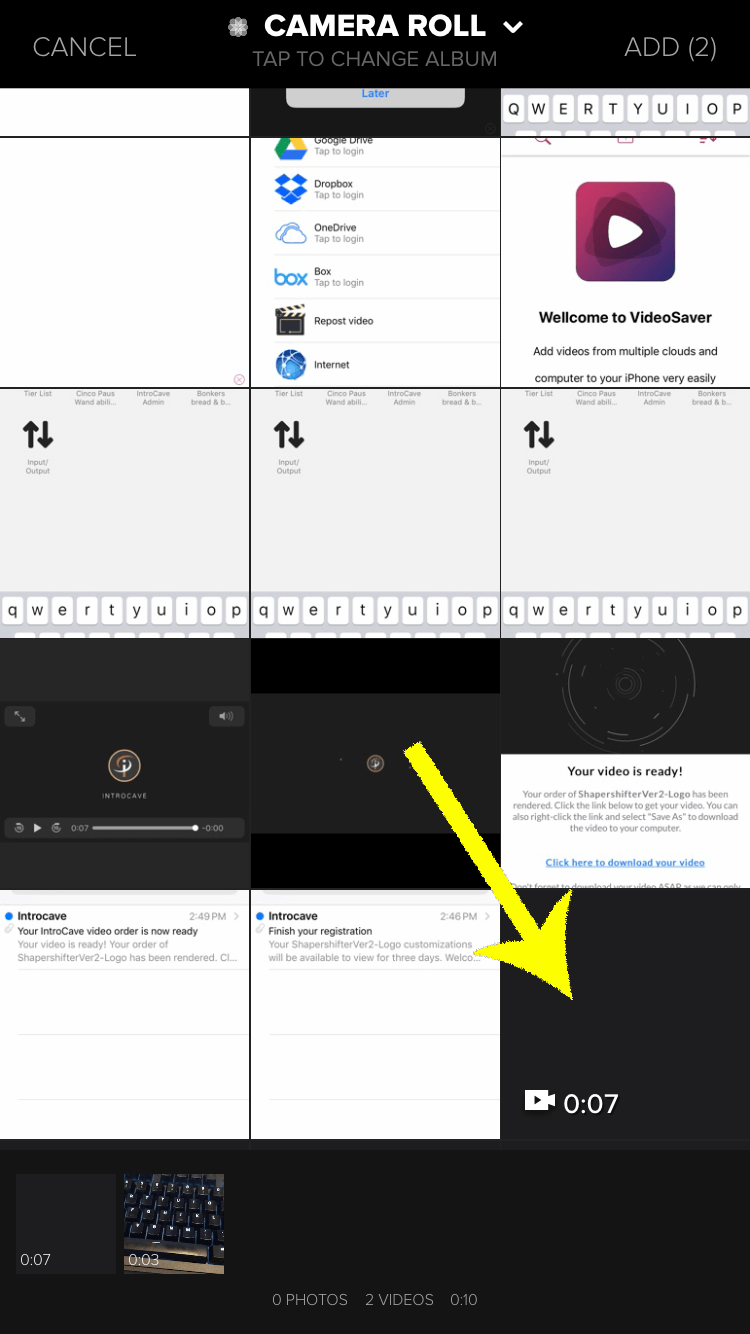
Once the file is downloaded, you should see it appear in the file list. Tapp on the three dots and select the Export option. If this is your first time using Video Saver, iOS will prompt your for permission to acces your photos. Tap the OK button and you're all done! Your downloaded intro video is now on your camera roll, and you're ready to move on to Part Three.

Video Saver - Edit, Trim, Flip

Same name, different app! This version of Video Saver has a purple icon. Video Saver will try to get you to agree to a subscription, but you don't need to pay anything just to download an intro video to your iPhone camera roll. Also be ready for some ads to pop up at random times. If that sounds risky, it is! But, believe it or not, this is one of the less risky apps I tried before putting this list together. It's pretty straightforward to git a video downloaded, just be careful not to tap anywhere else. Click here to download Video Saver on your iPhone.

Use Video Saver to save your intro video to your iPhone. When adding a new video, choose the Internet option.

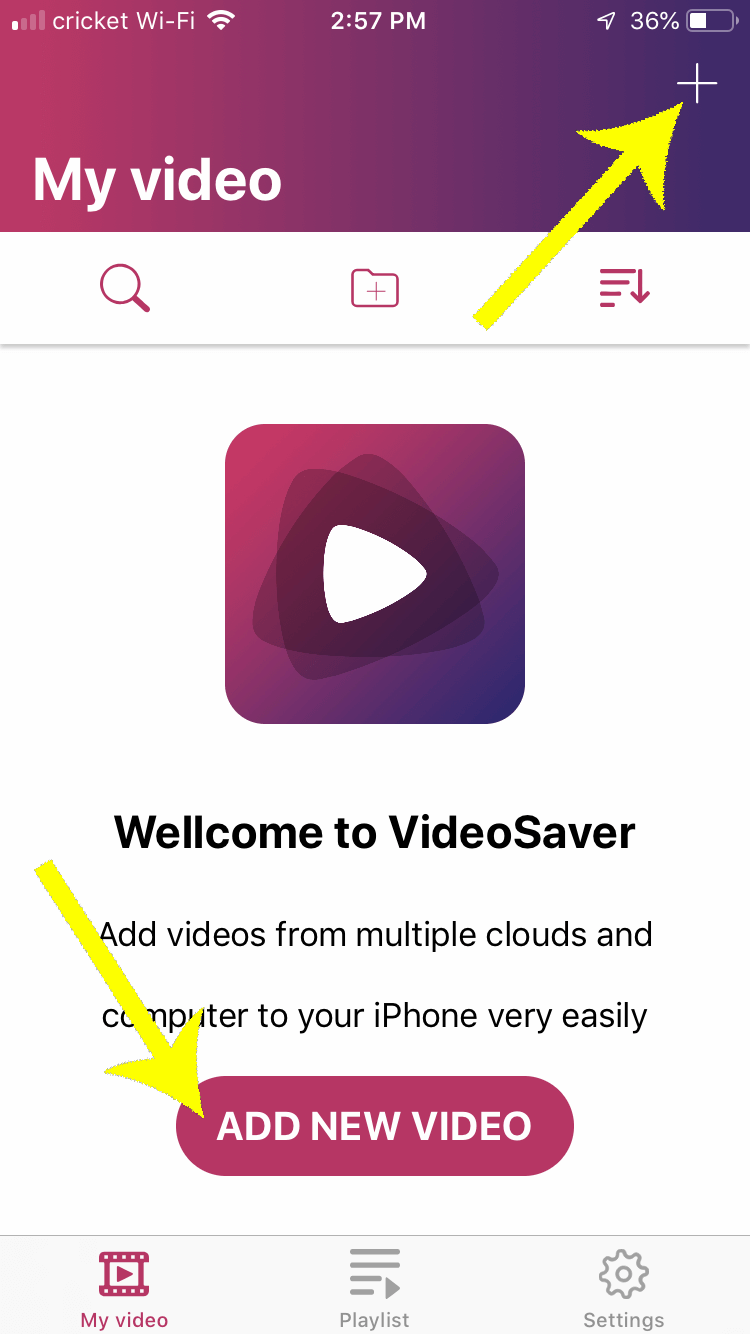
After you have the app installed and opened, you can press the "ADD NEW VIDEO" button on the welcome screen or press the plus icon in the top right.

Tap on the browser bar like you would in Safari. Paste the URL of your intro video into the URL bar. Whem prompted, select Download to begin downloading your intro video to your iPhone.

This view should look familiar if you've used Safari on your iPhone. Tap the URL bar at the top, paste in your video download link, and press the "Go" button at the bottom right.

Press the three dots on the right side of your download to open your video options. Select Save to Camera Roll to export your intro video to your camera roll. When your iPhone prompts you for access to your Camera Roll, select OK in order to save your intro video.

Once the video is downloaded, press the three little dots next to it and select "Save to camera roll." You'll be prompted to give the app permission to access your photos. Tap the OK button and you're all done! Your downloaded intro video is now on your camera roll, and you're ready to move on to Part Three.

Part Three
Add the Intro Video to Your Video

We're somewhat lucky here in that every iOS device comes with iMovie! I would definitely recommend starting there, but I'm also going to walk through a couple of other options for adding an intro video to your video on iPhone. Though I'm only featuring two tutorials below, I actually tried out almost a dozen video editors for iPhone. The vast majority of them charge a subscription fee in order to do basic things like export without a watermark, so I don't see any reason to use them over iMovie or Splice. If you already have a paid Creative Cloud account (or at least one that comes with Premiere), my favorite of the not-free apps I tested was Adobe Premiere Rush.

iMovie

iMovie has been around on Macs since 1999, and it has been included for free since 2003. The iOS version launched with the iPhone 4 back in 2010, and it has seen multiple major and minor release since then. Click here to download iMovie on your iPhone or click here to see Apple's product page for iMovie.

Add your intro video to your video on iPhone using iMovie. Create a new movie project to begin adding your intro video to the rest of your footage.

When you first open iMovie, you can tap on the Create Project button to start a new video project. Choose the Movie type when prompted.

Select your video clips in the iMovie file browser.

After you choose your movie type, you're presented with a file browser to choose media. You can choose just your intro video (which should be near the top if you just downloaded it) or go ahead and select all your videos.

Tap on the transition icon between clips to choose your transition type with iMovie on iPhone. I recommend using a Fade transition for intro videos using iMovie on iPhone.

By default, iMovie will stitch your videos together using a dissolve effect. Most of the intro videos available for purchase on Intro Maker fade to black at the end, so in my opinion you're better off going with a fade transition. Ultimately it's your choice, though!

Press the play icon in iMovie to preview your intro video on iPhone. Press the Done button when you've finished editing your intro video onto the rest of your footage.

You can press the play icon above the timeline to preview your video. Press the Done button when you're happy with your edits.

Press the Share/Export icon to begin exporting your finished video with iMovie on iPhone. Choose the Save Video option or directly upload to YouTube from iMovie on iPhone. Choose your file format (typically 1080p) in iMovie for iPhone.

To export your video or upload it to YouTube, press the export button on the bottom of the screen. You can upload directly to YouTube from here if you have the YouTube app installed, but for this article I'm just going to save it back to the camera roll. After choosing your destination, choose how you'd like to save your video. The iPhone is more than capable of recording and outputting 1080p video, so that's what I've gone with here.

It will take a moment to save out your finished video with iMovie for iPhone. When completed, iMovie will save your edited video to your photo library on iPhone.

It will take a moment to encode your video, but then you're good to go!

Splice - Video Editor & Maker

Splice has also been around awhile, winning multiple awards when it launched in 2015. The app has support for more advanced features like trimming footage, constructing slide shows, and adding from a nice selection of royalty free music. You can ignore most of those features if all you want to do is add an intro video to a pre-existing video, but Splice is also worth a look as your "main" editing program on iOS. Click here to download Splice.

Use Splice to add an intro video to your video on iPhone. Splice will pre-warn that they will prompt for photo access. Press OK when you receive the iPhone prompt for access to your photo library.

After you download and open the app, you create a new project by pressing the Start New Project button or by tapping the little plus sign in the top right of the home screen. The first time you do this, the app will request access to your photo library through a warmup screen and then the native dialog.

Select your intro video and other clips in the Splice file browser on iPhone. Press the Add button to add your clips using Splice on iPhone.

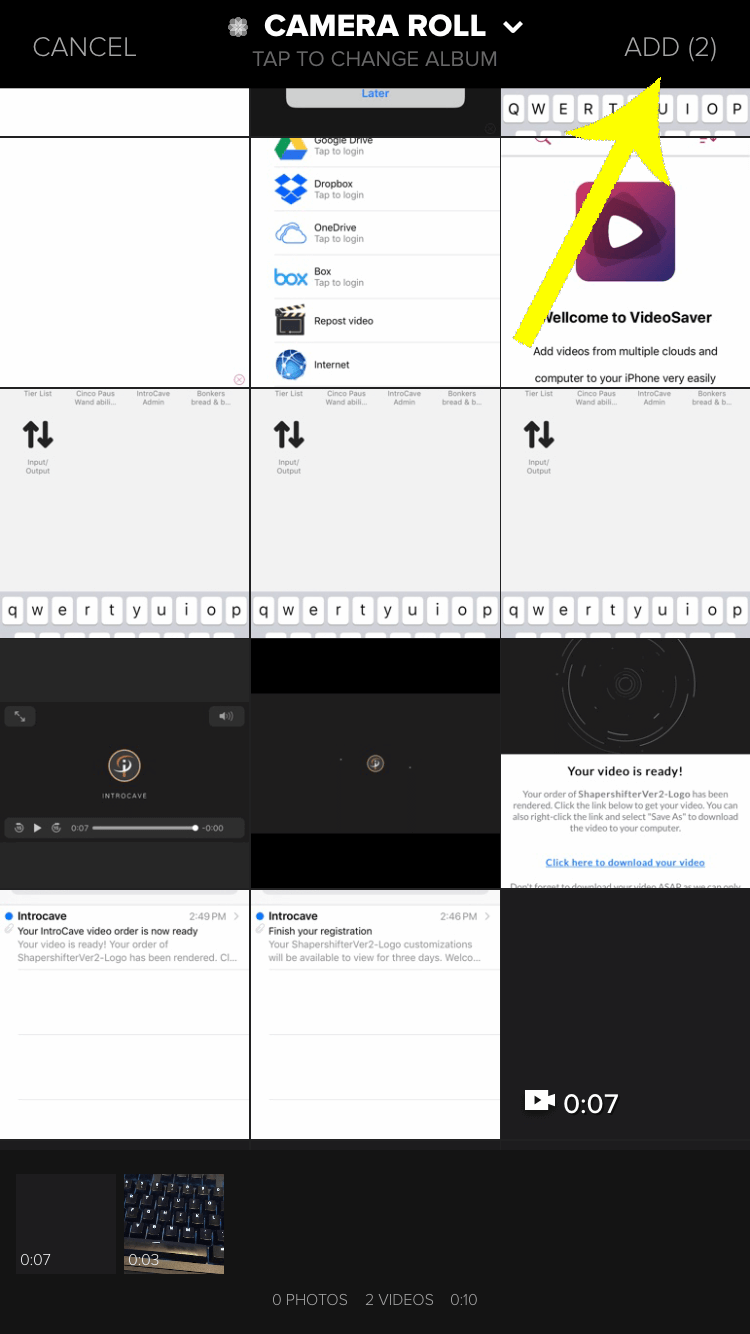
After granting access to your photo library, you'll be presented with a file browser. These are sorted by date, so if you followed the instructions in Part Two your intro video should be near the top. You can select a single video and then add more later or go ahead and select all the clips at one time. When you've picked all your video clips, tap the Add button in the top right to move to the next screen.

Skip the audio step.

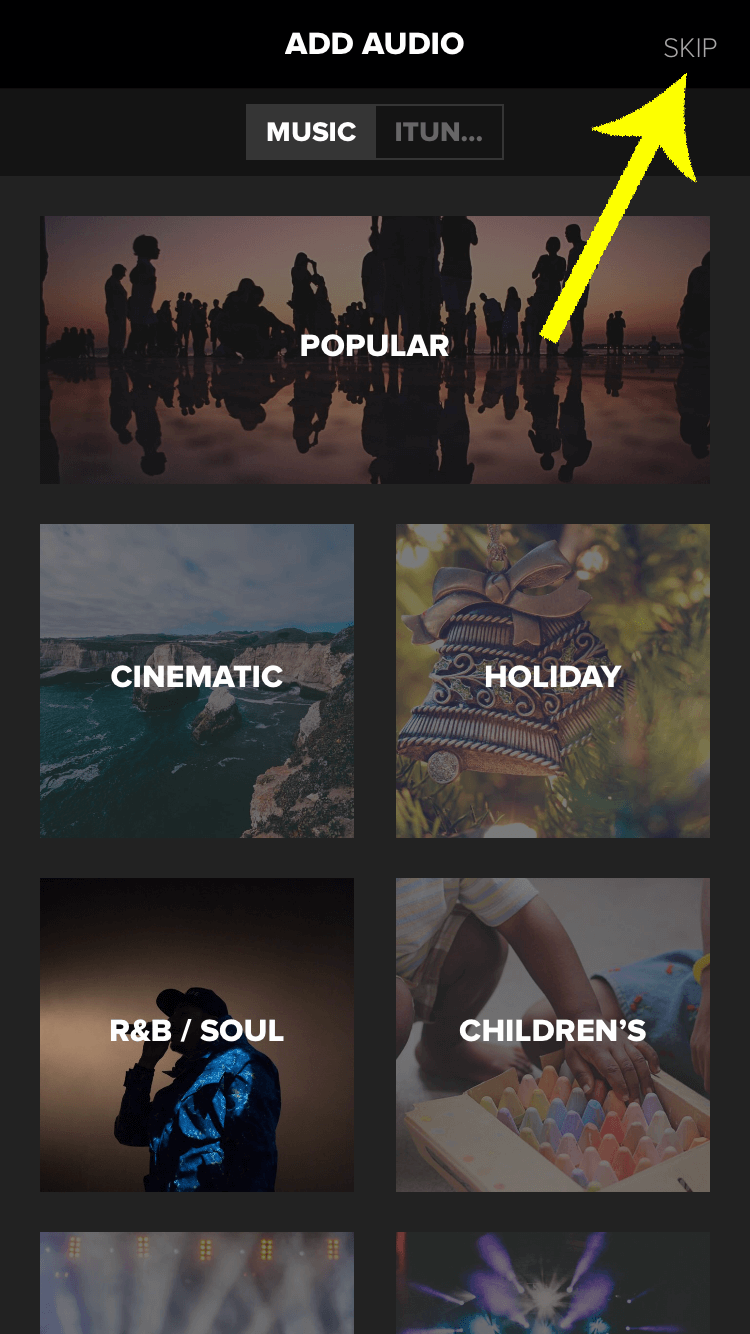
In this example we're merely stitching two videos together, so we don't need to add music and can just press the Skip button at the top right.

Tap on the Default Transition option to choose something other than Crossfade I recommend using Fade to Black as your default transition for adding an intro video to your clips on iPhone with Splice.

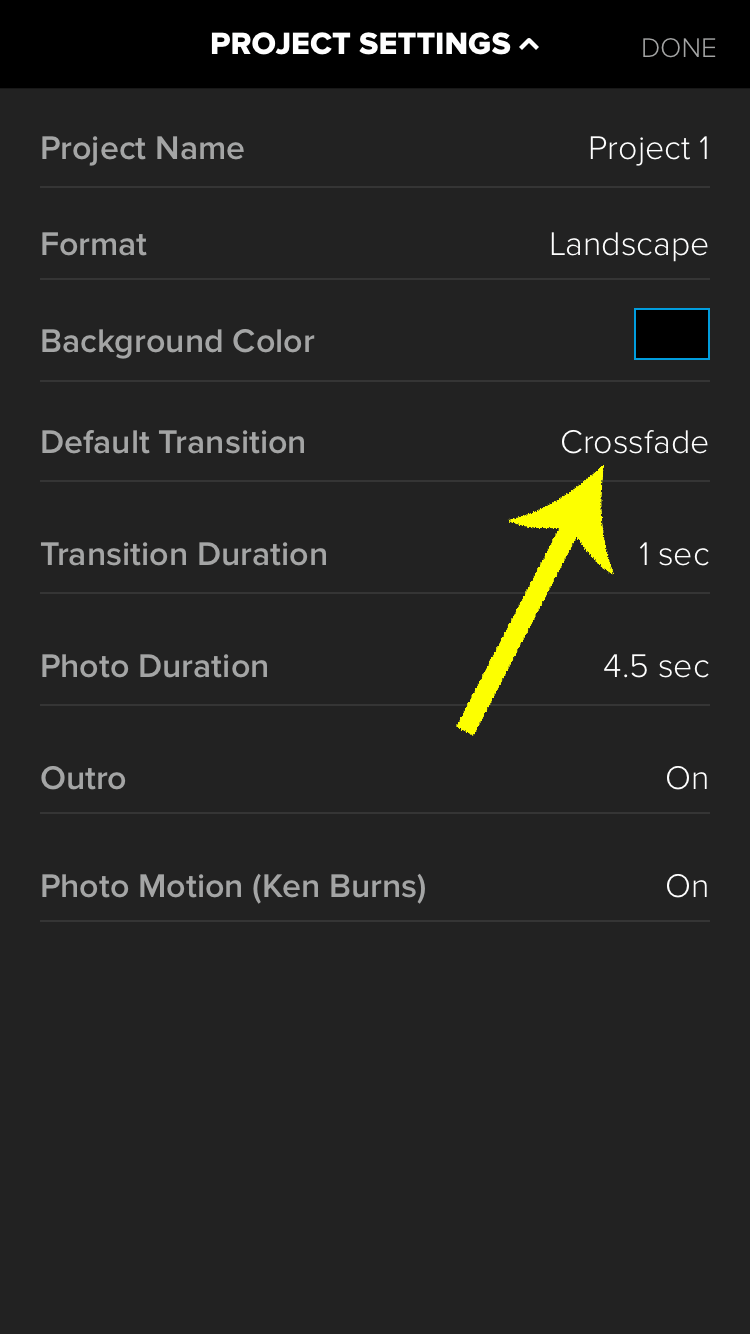
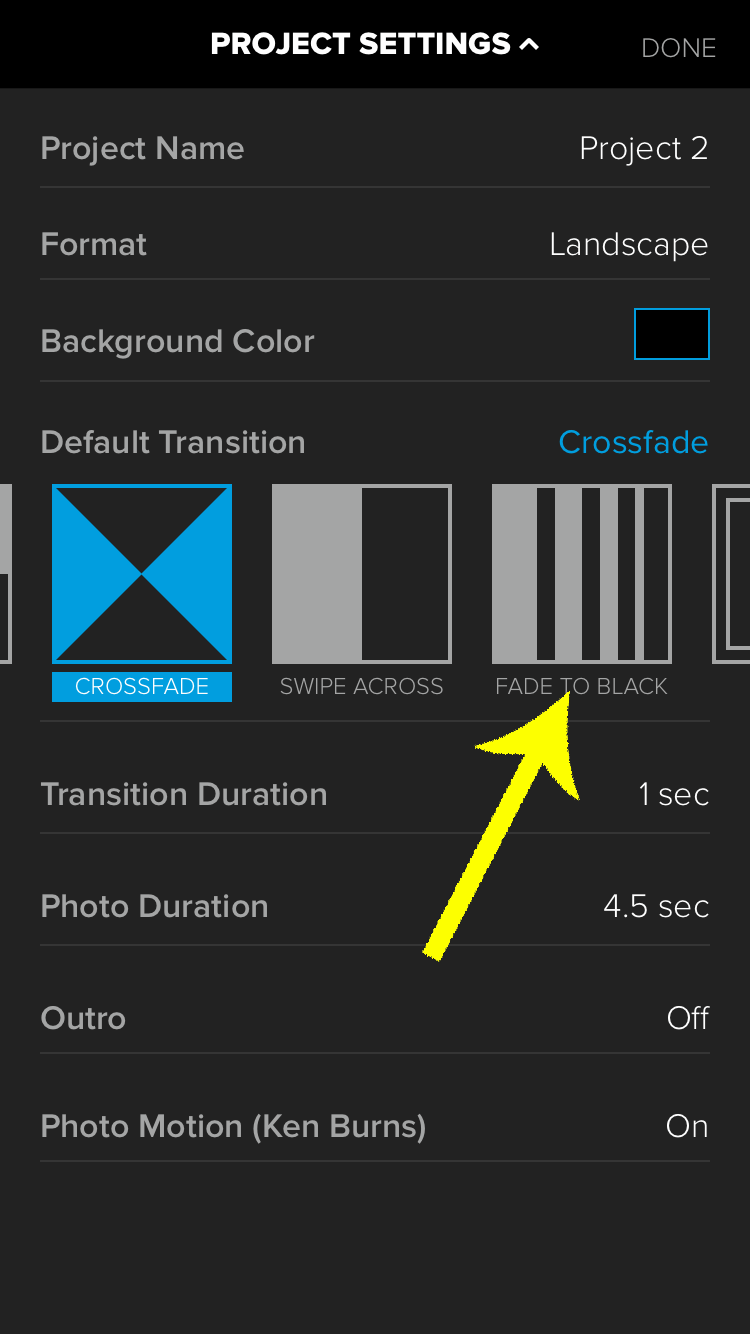
Before dumping you onto a timeline view, Splice lets you set some nice project defaults. Many of the intro video templates for sale on Intro Maker fade to black, so crossfades tend to look at little weird. I recommend tapping on the Default Transition option and changing it to Fade to Black.

Turn the Outro off in your default settings using Splice for iPhone. Press the Done button when you're happy with your Splice settings.

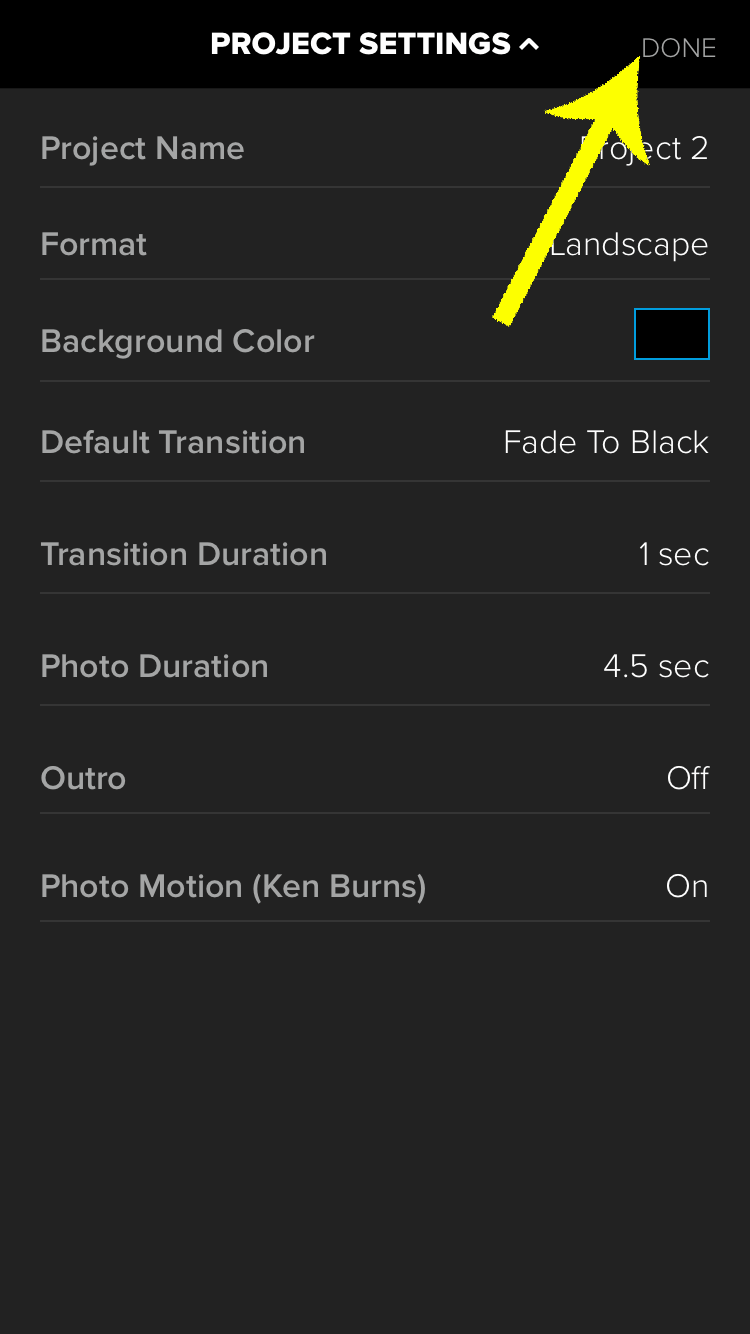
Splice will also add an annoying Outro to your timeline automatically. You can disable this here in the setting screen to save yourself time later. Once you're happy with your settings, press the Done button at the top right.

When your edits are complete, press the Export/Share button at the top right of Splice for iPhone. Press the Save button to save your completed video to your camera roll with Splice for iPhone.

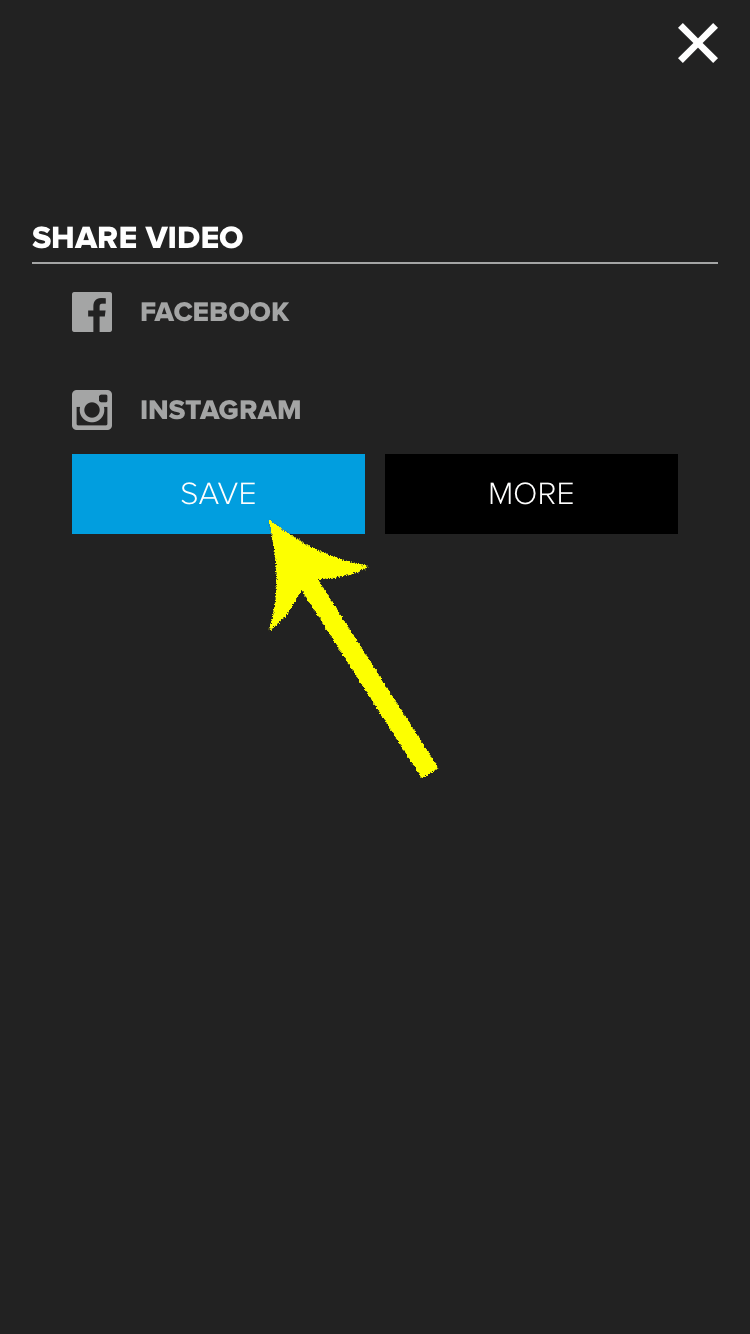
After the settings, you finally reach your timeline view. You can continue to add footage, tweak transitions, or do your normal editing and previewing tasks here. Once you're happy with your video (no extra steps really needed if you're just adding an intro video), press the export button at the top right. The Save button will save it back to your camera roll, while the More button brings up the native share prompt if you want to go straight to YouTube or another service.

Choose your video encoding options (usually 1080p) with Splice for iPhone. Your video with your new intro video will save to your camera roll using Splice for iPhone. You've successfully added your intro video to your other clips using Splice for iPhone.

After choosing your export settings, your video will export. It will take a moment to encode your video, but then you're good to go!

More Recommendations?

If you've got other recommendations for apps to download videos or edit intros onto videos, I'd love to hear them! The apps featured here are a good start, but there are certainly going to be other good apps out there.

it me

IntroCave is a one-person-show operated by Will Hankinson, but it's not 100% accurate to say every word is written by me. Some articles were live on the site when I took over. I hire writers from time to time to work on specific articles. People keep asking me to do guest posts, but I haven't actually seen any relevant submissions yet. "Intro Maker staff" might make a better by-line, but currently that's just me. I've been building digital things for 10+ years now, and some of my favorite projects are posted over at my personal website if you want to take a look!

Previous Article
Next Article
;